Since starting our blog in 2011, we have received hundreds and hundreds of emails from people asking how they can start their own blog.
We are passionate about blogging because it has opened up a whole new world for us – it turned something we love (sharing our favorite recipes) into a full-time career. If we did it, anyone can do it. 🙂
So over the next few weeks, we are going to be sharing all our best tips and tricks to start a blog, grow a blog, and make money from your blog. When we started back in 2011, we figured a lot of things out through trial and error . . . we hope that we can help make things a little bit easier by providing you with all the steps you need to make it happen!
People ask us all the time . . . why should I start a blog?
Well, here are a couple of reasons why:
1. To share a story. Everyone has a story . . . and chances are you story can help someone else. When I was struggling with infertility, I googled it and spent hours reading other women’s stories and struggles with infertility that they had shared on their blogs. I was so grateful that they were willing to share things that I was feeling and going through. The internet is connecting people like never before!
2. To get a book deal. Going right along with everyone has a story . . . many times publishers will approach people who have an online presence (such as a blog) to write a book. These days, it’s very rare for someone to land a book deal without some type of blog or website. Some of the best-selling books out there actually started as a story that someone shared on a blog – such as this one, this one, this one . . . and even us.
3. To grow your business. Whether you own a large corporation or run a small Etsy shop out of your own, a blog will help you reach a larger audience (EVERYONE is online) for very little money (if any). If a business does not have an online presence, they might not survive the next couple of years because being online is how business works these days.
4. To make money from home, sharing what you love. We started our blog as just a way to stay in touch with each other and sharing family recipes that we grew up with. It has now turned into a full-time income for each of the six sisters, plus our parents, plus some employees that we have helping behind the scenes. Now, keep in mind that it didn’t happen overnight, but it did happen. And people do it all the time. If you are serious about turning a blog into an income, we will help you make it happen!
5. To keep a journal. Not all blogs need to public. In fact, I have a private blog that I keep just for myself to record my private thoughts or pictures of my family and what is going on in our lives. There are also many companies who will turn your blog into a book, so it could also be a scrapbook!
If you can relate to any of those reasons, then let’s get started!!!
First things first . . .
Decide what you are going to blog about – find your passion.
What is it that you are passionate about?
For us, it was recipes and family dinner. We have one friend who is passionate about different ways to style her daughters’ hair. We have another friend who is passionate about helping people save money. My husband is passionate about health and fitness. My sister-in-law is passionate about motherhood and raising her autistic son. One of our friends is passionate about dating her husband.
So what is it that YOU are passionate about?
Make sure that when you choose what you want to blog about, it’s something that you enjoy, something that you can talk about for many, many posts (if it’s something that you could only write about one time, you should probably expand your topic), and make sure that it’s something you feel like you know something about. The reason that people read blogs is because they see you as the go-to resource in that area . . . so you have to know what you are talking about. 😉
Let the set-up begin!
Getting it set up is pretty simple – and we have made it even more simple by providing step-by-step directions to get you going! Even with little computer experience, you can set up your own blog in no time. By the end of this tutorial, you will have your own self-hosted WordPress site, which is one of the most common and most user-friendly sites to have (and what we use!).
Some of the links included in this post are affiliate links, which means that at no additional cost to you, we will earn a commission if you choose to make a purchase. Thank you for your support in this way.
We have broken this process down into 3 easy steps:
1. Purchase hosting
2. Choose a domain
3. Install WordPress
After that, you will be ready to go! Let’s get started!
FIND A HOST
The first thing that you need to do is purchase hosting. A host provides server space for your website so that people can find you on the internet. To explain it in simpler terms: if your website was a car, the host would be a garage (or a place to park your website).
We recommend getting started with a self-hosted WordPress site (instead of a free service like Blogger or WordPress.com) because it gives you the most control over your site and it will save you headache down the road so that you don’t have to transfer everything over (which is what we had to do and it was crazy!). Trust us – you will be grateful that you started out with a self-hosted site!
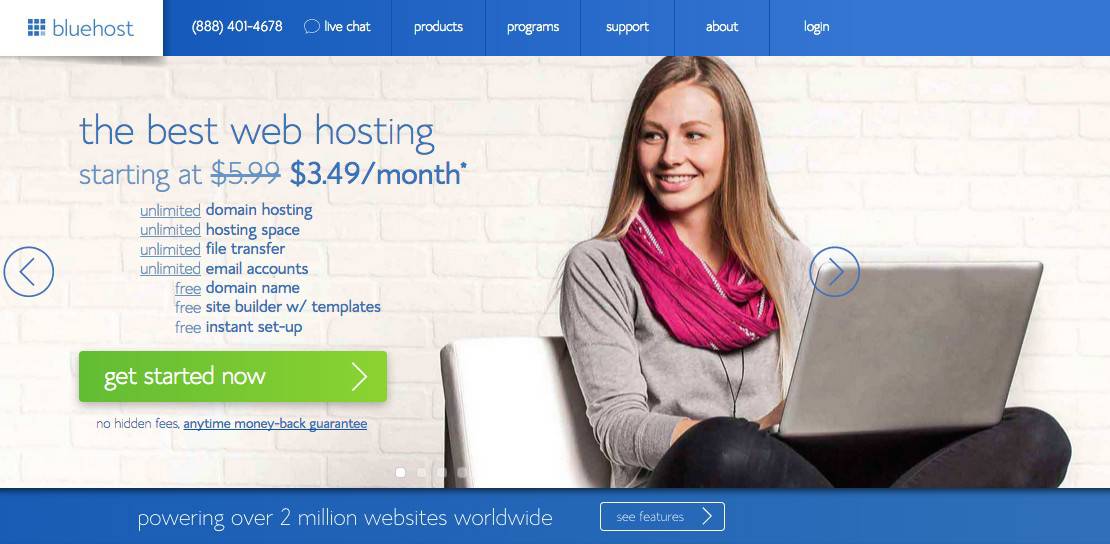
To get started, CLICK HERE TO GO TO BLUEHOST (this link will open in a new window, so you can still follow the instructions as you get set up). We love Bluehost hosting because of their amazing customer service, quality hosting, and great prices – and it comes with a free domain name!
Click on the green GET STARTED NOW button.
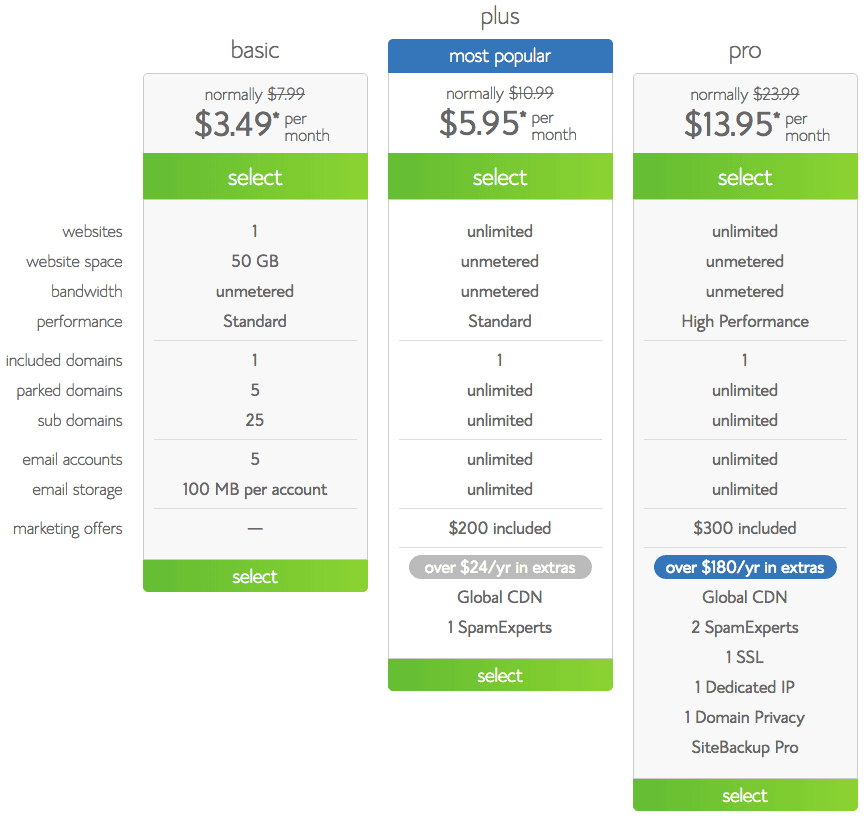
SELECT YOUR PLAN
The basic plan on Bluehost starts out at only $3.49/month, which is perfect for someone just getting started. However, the Plus plan does have some additional perks, so it might be something to look into. Whatever plan you choose, you can upgrade at any time and each plan does include a domain name, which is awesome.
Click the SELECT button on the plan you choose and move to the next step.

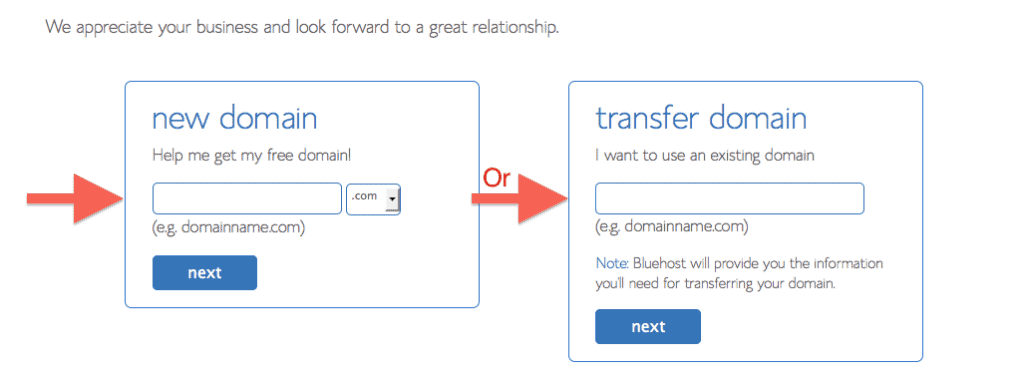
Now comes the fun part . . . you get to choose the web address of where people will find you! For us, our domain is www.SixSistersStuff.com. You can either choose a brand new name (enter it in on the left side) or if you have an existing domain, you can enter that also (enter it on the right side).
As you choose your domain name, keep these tips in mind:
-try to use ‘.com’ at the end, if possible
-make it easy to say and spell
-keep it short
-make it memorable
-avoid numbers and hyphens, if possible
Click the blue NEXT button.
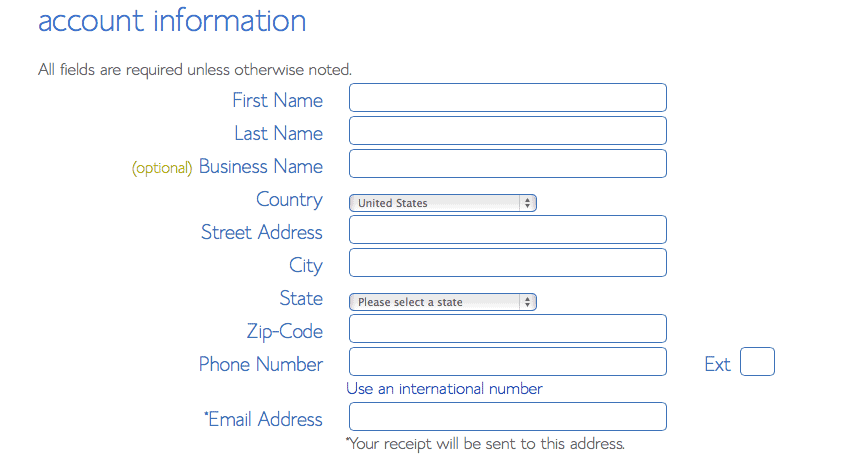
ENTER YOUR ACCOUNT INFORMATION
Make sure to enter in the correct email address, as this is where they will send you all your login info.
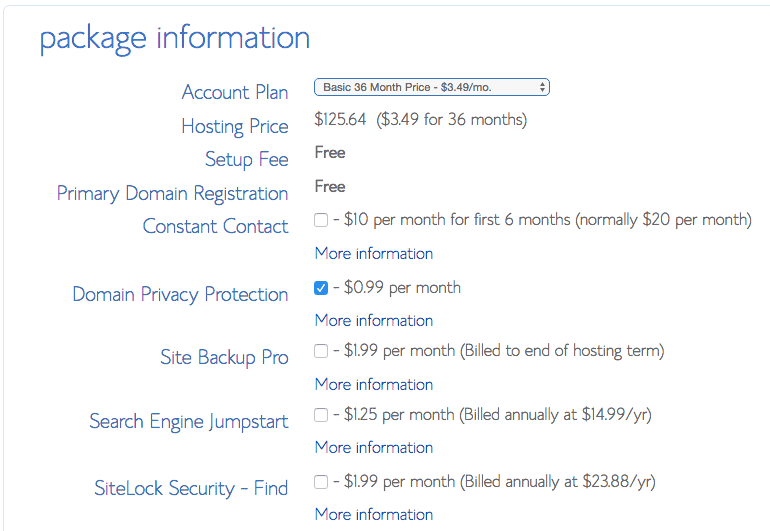
CHOOSE YOUR HOSTING PACKAGE
Choose your Account Plan from the drop down menu. Make sure that you choose a package based on how far in advance you want to pay. Keep in mind that Bluehost bills a year at a time, but it breaks down to be the best monthly price with the highest quality service.
Don’t worry about the add-ons . . . the only one that we would have you consider would be the Domain Privacy Protection, which keeps your personal information private.
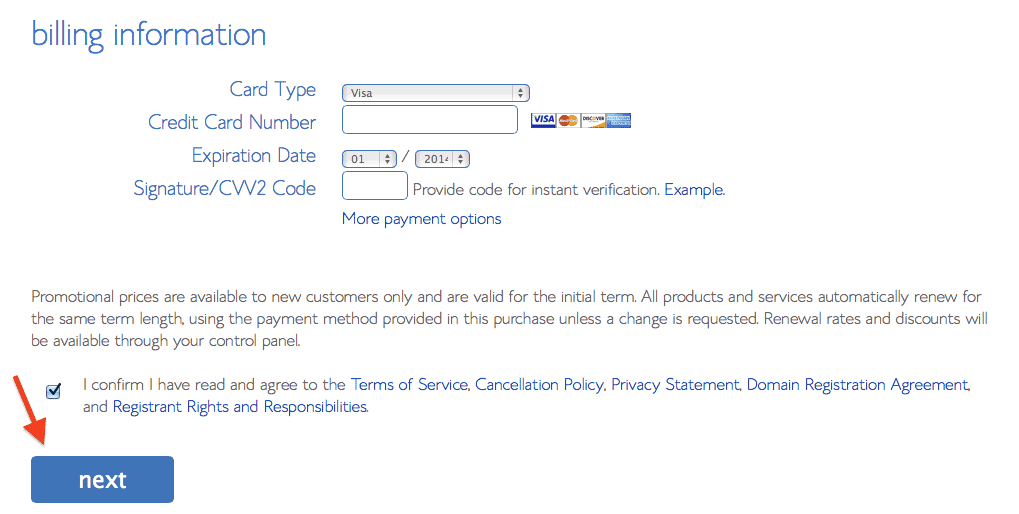
ENTER BILLING INFORMATION
Put in your billing info, check the confirm box, and click on the blue NEXT button.
SKIP THE UPGRADES AND CHECK YOUR EMAIL
You will get asked if you are interested in any upgrades, just skip them for now. Check your email and you should find a welcome email from Bluehost. In that email will be your Control Panel (cpanel) Login info. Keep this info in a safe place!
Hooray! You have completed setting up hosting!
Now it’s time to install WordPress.

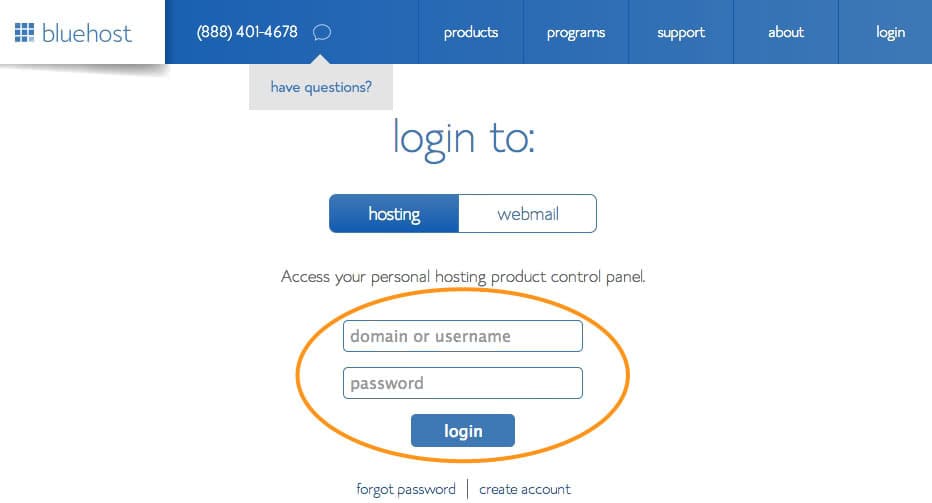
Login to your Bluehost and click on LOGIN in the upper right corner.
Enter your cpanel login info from the welcome email you just received. Make sure you are logging into hosting and not webmail.
INSTALL WORDPRESS
On your panel page, click the INSTALL WORDPRESS button in the middle of the screen.
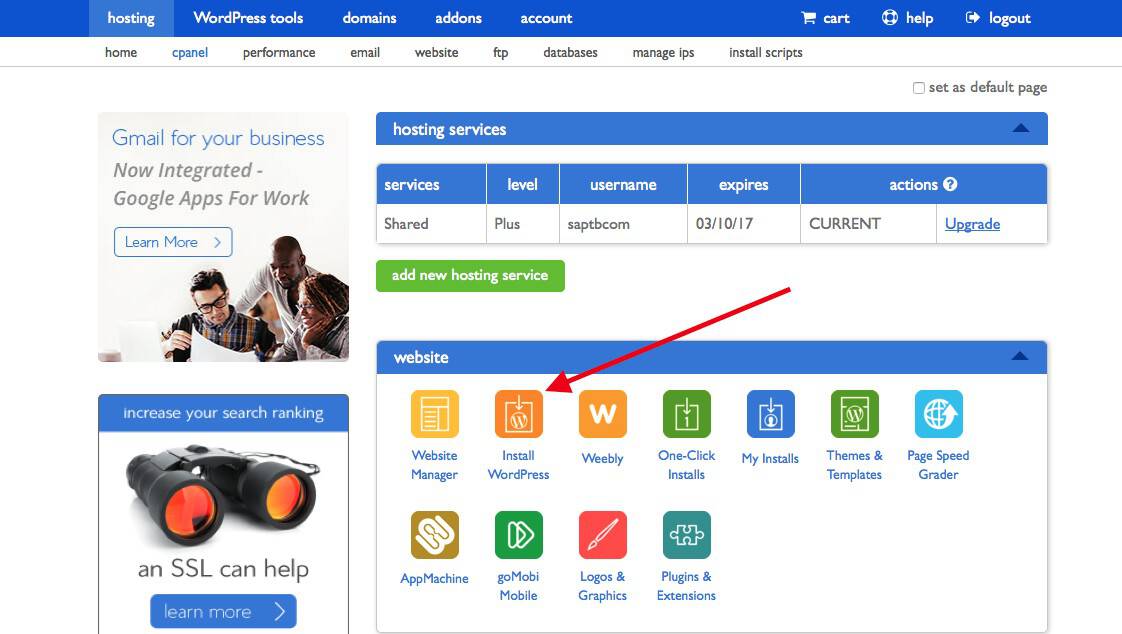
Click the green INSTALL button.
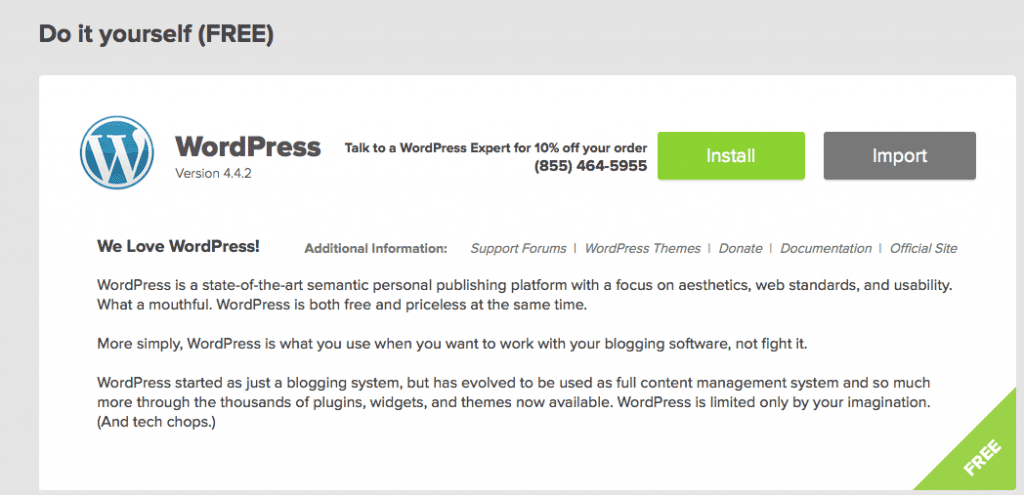
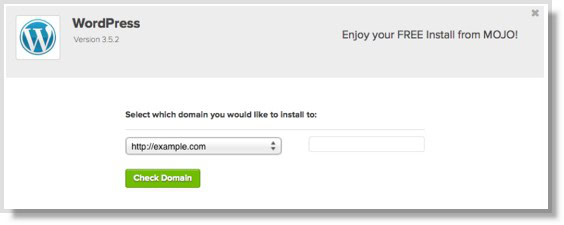
Choose your domain from the drop down menu to show where you want to install WordPress, then click the green CHECK DOMAIN button. You can just leave the other field empty.
CHOOSE YOUR USER INFO
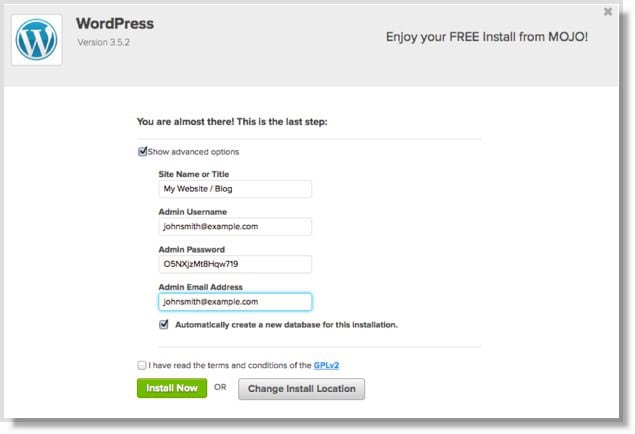
Check the little box next to Show Advanced Options.
Enter your site name or title – ours is Six Sisters’ Stuff.
Choose an admin username, then choose an admin password – this will become the login info you use to sign into WordPress once it’s installed.
Enter your email address, click the box for terms and conditions, then click the green INSTALL NOW button.

Once it’s done installing, you are now the proud owner of your own self-hosted website!! Congratulations!
There are a couple of things that you can do now:
Start writing!! Share with the world whatever you want – it’s your blog!
Or, you can give your website a more custom design by adding a THEME.
We are not website designers by any means and HTML code is literally a foreign language to us, so we stuck with something simple and used the Genesis Framework as a base. Then to make it pretty, we recommend choosing a simple theme, like these ones from Designer Blogs. We have used Designer Blogs for a couple of projects and other websites and we highly recommend them. They are very reasonably priced and will even install it for you for free, so it’s worth every penny!
Another great source for themes is Restored 316 – they have a great selection and are also reasonably priced with great customer service.
From here, it’s time to get to work.
You could write a killer about page, you could add some things in your side bar, or start producing amazing content.
Blogging is an incredible journey and we are so excited for you.
If you are ready to start growing your blog, get our FREE eBook HERE:









Questions & Reviews