If I had a lot of extra money to decorate my house, I think I could get it looking pretty nice! Unfortunately, my husband doesn’t seem to think we need to put as much money into the decorating budget as I do. My husband is planning on starting his Master’s program this Fall, which means that I have to decorate on a “student’s budget.”
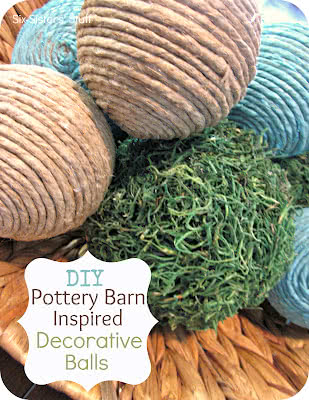
I was recently walking around a home decor store and wanted to find something to use as a new centerpiece for our dining room table. I found some neutral, decorative balls that would go perfectly in a basket or vase. I was about to get them when I realized they were about $20 a piece! That would be quite an expensive ball-filled basket!
I snapped a few pictures on my phone and headed to the craft store to get supplies to do it myself. I was able to make about ten balls for the price of one store bought one! Not bad at all!
Here is how to make your own:
Twine Decorative Ball:
Supplies: Twine/hemp, hot glue, hot glue gun, scissors, and Styrofoam ball(s)
Step 1: Using one end of your roll of twine/hemp start rolling a spiral, using hot glue to hold together (I would roll a little, put a dab of glue, roll a little, put a dab of glue, etc). Continue rolling the spiral until it is about the size of a nickel.
Step 2: Attach your twine/hemp spiral to a Styrofoam ball using hot glue.
Step 3: Continue wrapping your twine/hemp around the entire Styrofoam ball using hot glue to hold in place. Be sure to secure the end with some extra hot glue after you have covered your whole ball. Peel off excess hot glue when finished.
Optional:
I wanted to have two different colors of twine balls, so I used spray paint to add a little tint to a few of them.
I covered the ground with newspaper and put the twine balls on top. I sprayed about 2-3 coats of spray paint on each ball to reach the desired color. Be sure to coat all sides of each ball evenly.
Decorative Moss Ball:
(Beware….this one makes a little bit of a mess!)
Supplies: Spanish moss (can be found in the floral section of any craft store), hot glue sticks, hot glue gun, scissors, Styrofoam ball(s)
Step 1: Cut off small sections of moss and attach to your Styrofoam ball using glue. Only add moss in about 1 inch sections or your glue will dry before you can stick it on. Be sure to use enough moss that you can push it into the glue without burning your fingers.
Step 2: After your Styrofoam ball is completely covered in moss, go back and use hot glue to fill in spots where the Styrofoam is showing through. Also, be sure to glue down loose ends so all the moss is securely glued to your ball.
Step 3: After gluing down all loose ends, trim any pieces of moss that are too long. You want all of your moss to be really close to the Styrofoam ball so it looks neat and uniform. Shake any excess moss off and you are finished!








Questions & Reviews