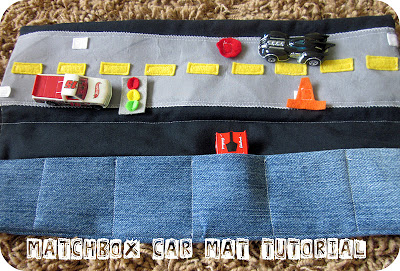
I don’t know about your kids, but I have a rowdy 1 and a 1/2 year old that has a little (I wish) trouble holding still. Our biggest, noisy outbursts always seem to happen when we are in places where he needs to hold still and be quiet, especially in church. I have seen a lot of these matchbox car mats to entertain kids, but loved how easy this one from Homemade by Jill was! I even dumbed it down and tweaked it a little to make even simpler!
(My only sewing skills come from Home Ec in 7th grade, so don’t look too closely! Ha ha!)
Materials:
- two pieces of denim (17 x 10 inches and 17 x 6 inches)
- one piece of Duck Cloth or other heavy fabric (17 x 10 inches)
- gray and yellow felt (I didn’t have any gray felt on hand and used fabric, it worked fine!)
- piece of thick ribbon, about 12″ long
- Velcro
- scrap fabric for applique
- sewing machine and supplies
- scraps of felt for road signs, optional
Step 1: Cut your fabric as shown above. I used a pair of my husband’s old jeans and a fat quarter I got in a discount bin for 70 cents! Gotta love a bargain! If you can’t find duck cloth, any thick fabric will do.
Step 2: Take your 17 x 6 inch piece of denim, fold it in half so the right side faces out, and press. This is going to be your car pockets at the bottom of the mat. Line up the raw edges of the denim with the bottom on the duck cloth and pin in place. Sew along the bottom edge to secure. Sew vertical lines every 2.75 inches across your your denim to create pockets (I used a ruler and made little marks every 2.75 inches). Make sure you back stitch at the top and bottom so your pockets are nice and sturdy!
Step 3: Sew your road piece centered in the top half of the duck cloth. I used a zig zag stitch over the edge of my fabric so it wouldn’t fray. If you use felt, you won’t have to worry about that!
Step 4: Cut 1 x 1/4 inch road dashes out of yellow felt. Pin them in place on the road and sew around them. I also sewed on 1/2 x 1/2 inch pieces of velcro so road signs could be stuck on and moved around.
I cut out road signs and cones out of felt and attached the opposite side of the velcro to them. I thought this might add for a little extra entertainment, but it is totally optional!
Step 5: Cut out a car applique from your scrap of fabric and wheels out of black felt (or other fabric). I used THIS pattern that Jill has on her site. Center your applique in the bottom half of your denim, as shown below. Pin the car applique to your denim. Sew on car applique and wheels (as you can see, I can’t sew a circle!). Sew on 1 inch of velcro to the middle of your car applique. This will be your velcro closure.
Step 6: Pin a long piece of ribbon (mine was about 12 inches) to the denim fabric, lining it up with the velcro so it will be in the right place when you fold up the mat and use the velcro closure. It is better to be safe and sorry with this step by using a long piece of ribbon. I originally used 6 inches, and it wasn’t long enough to close the mat when I folded it up so I had to start over. I added fray block to the ends of the ribbon so they wouldn’t fray and then stitched the pinned side in place.
Step 7: Lay the duck cloth piece on top of the denim piece with the right sides facing together, and pin. Sew around the edges using a 1/4 inch seam. Leave about a 3 inch gap for turning the caddy right side out.
Step 8: Turn the mat right side out through the 3 inch opening and sew closed.
Step 9: Fold the mat in half with the denim on the outside. Then fold into thirds so the car applique ends up on top. Wrap your ribbon around the folded mat and cut it to the right length for your velcro closure. Add fray block to the end of your ribbon to prevent fraying. Sew the opposite side of the velcro to the end of your ribbon so you can velcro the mat shut.
And there you have it!
It definitely provided some quiet entertainment for us! Happy sewing!
Linking to:
http://www.tipjunkie.com


Your newest follower!
Marie
mylilpinkpocket.blogspot.com
A mommy's life...with a touch of yellow
Tyandwhitneyulrich.blogspot.com
http://mygratitudeattitudes.blogspot.com/2009/09/car-cozie-tutorial-and-etsy-re.html