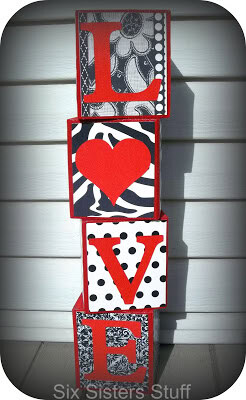
Step 1. You will need 4 square blocks. I went to home depot and got a 4 inch by 4 inch by 8 foot piece of wood. Ask them to cut it for you and they gladly will (LOVE HOME DEPOT!). Needless to say I came home with a ton of square blocks which I know I will find all kinds of things to do with.
Step 2. Sand your wood. Make sure all your edges are smooth.
Step 3. Paint. I painted all the sides of each block except the bottom. I figure no one will ever see that. 🙂 Wait until it is dry and add a second coat.
Step 4. Find your paper. I had some left over scrapbook paper and found some that I liked. Then cut it into squares that are the same size as your blocks.
Step 5. Mod Podge. (you can find it at any craft store and Walmart). Make sure all your papers fit right on your squares (I cut mine to be just a tiny bit smaller than my blocks so that the painted edges show) then paint a small about of Mod Podge on the wood block.
Place your paper on and smooth out any wrinkles. Let dry.
Step 6. After it is dried put another thin coat of Mod Podge on to make sure it stays in place. Let dry.
Step 7. Letters. I am lucky to have a friend that let me use her Cricut to cut out my letters. But if you don’t have one, you could easily cut out the letters by hand. I usually find a font on my computer, print out big letters, cut them out and trace them onto the paper Iwant my letters to be on. Then I cut out the traced letters and am set. 🙂
Step 8. Put a thin coat of Mod Podge on the side of the block where you want you letter. Put your letter on – smoothing out any bumps – then add another thin coat of Mod Podge over top of the letter.
Let Dry and you are finished!!!!!


Questions & Reviews