Now that summer is in full swing I’m sure most of us have put away the rest of our shoes and live in flip flops and sandals. I love a good pampering but don’t want to pay an arm and a leg for it! I found these awesome tips for the perfect at-home pedicure at Women’s Health Magazine.
Step 1:
Soak those dogs!
Don’t cheat yourself out of the foot soak just because you’re doing your pedi at home. This step does more than clean your feet and make you feel amazing. It also softens dead skin cells in preparation for exfoliation. As you let a tub fill with warm water, remove all traces of old polish. Soak your feet for five to 10 minutes. (You can add a tsp. of any oil and a half cup of Epsom salts if you’re feeling up to it!
Step 2:
Scrub off dead skin!
To slough off rough spots, look for exfoliants with medium-size grains, like sugar or salt crystals (sugar is less irritating), and moisturizing agents such as jojoba or almond oil. Massage each foot for a minute or two with a quarter-size blob of scrub. Start at your heel and work your way out to your toes, ankles, and calves using tiny circular motions. Rinse off with warm water.
Step 3:
Buff away bumps!
Now it’s time to smooth down nasty calluses. Wet a pumice stone or lava rock and coat it with a little body wash. Using a back-and-forth motion, lightly scrape your heels, the bottoms of your feet, and your toes. The key is to be gentle?you want to abrade only the very top layer of skin, not rub your flesh raw.
Step 4:
Trim and file!
Trim your nails straight across, then smooth the edges with a nail file. Giving them a slightly rounded shape helps prevent painful ingrown nails.
Step 5:
Moisturize and massage!
Drench your soles with a moisturizing product made especially for your feet.
Using a circular motion, massage a quarter-size dollop of cream all over your feet and lower legs. Then, with the knuckle of your index finger, press down gently into the arch of one foot and knead; repeat on the other foot. The mini massage will relax your feet while boosting circulation, which reduces swelling.
Using a circular motion, massage a quarter-size dollop of cream all over your feet and lower legs. Then, with the knuckle of your index finger, press down gently into the arch of one foot and knead; repeat on the other foot. The mini massage will relax your feet while boosting circulation, which reduces swelling.
Step 6:
Polish!
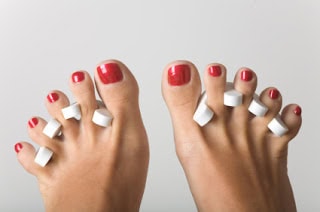
First, swipe your nails with a nail polish remover to get rid of any cream residue left over from your foot massage. Insert foam toe separators or roll up a paper towel and weave it through your toes. Next, apply a clear basecoat.
Now you’re ready to apply color. This summer’s pedi colors are not for shy girls?we’re talking hot pink, shocking purple, and juicy tangerine. Starting just above the cuticle, sweep the bristles down the center of your nail toward the tip of your toe. Then sweep color on each side and across the edge of your nail. After you’ve done all 10 nails, add a second coat. To prevent chipping and seal in color, layer on a finishing topcoat.
Now you’re ready to apply color. This summer’s pedi colors are not for shy girls?we’re talking hot pink, shocking purple, and juicy tangerine. Starting just above the cuticle, sweep the bristles down the center of your nail toward the tip of your toe. Then sweep color on each side and across the edge of your nail. After you’ve done all 10 nails, add a second coat. To prevent chipping and seal in color, layer on a finishing topcoat.
When your nails are just about dry, massage in a few drops of oil to cuticles. It will pump up shine and creates a barrier to protect against smudges.


I might just have to do that soon... just as soon as Sydney's weather warms up!
PS: I am now following your blog.
The Random Mommy Blog