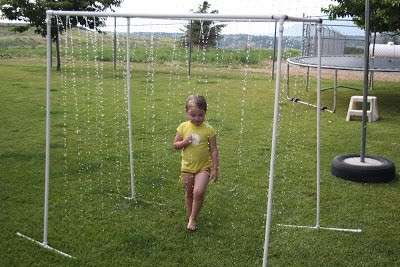
I don’t know how the weather is where you are, but the dog days of summer are here in Utah. It’s hot, we’re sweaty, and the kids are kind of restless and bored. I had seen a couple of these “Kid Washes” floating around Blogland and explained the idea to my husband . . . the wheels in our heads starting turning and this is what we came up with:
The Ultimate Kid Wash!
Don’t be intimidated! You can totally do this!!
Here is what you need:
-2 (10 foot) 3/4″ PVC pipes (cut 2 5-foot pieces and 2 3-foot pieces from the 2 ten foot pipes)
-3 (10 foot) 1/2″ PVC pipes (cut 4 5-foot pieces and 8 1-foot pieces from the 3 ten foot pipes)
-4 (1/2″) Tees
-4 (3/4″-1/2″) threaded side outlet elbows
-4 (1/2″) male adapters
-7 (1/2″) end caps
-1 (1/2″) hose adapter
-Primer and cement
(Take this wonderful list to Lowe’s or Home Depot, hand it to one of the workers, and they can find all these little pieces for you. Also, have them cut your pipes! If it is a slower day, they will happily do it for you!)
Here are all your random parts from the list . . . let the building begin!
First, make 3 of these upside-down “T”-shapes using 1 5-foot (1/2″) pipe, 2 1-foot (1/2″) pipes, 1 tee, and 2 end caps. At the top is your male adapter.
Build one more upside-down “T”, only this time you will use one end cap and one hose adapter.
At Home Depot, they were sold out of the right size of hose adapter, so we had to purchase an extra piece so that our hose adapter would fit. However, we later found the correct size hose adapter at Lowe’s (after this picture was taken), so you won’t have this extra piece like we do! (Pictured is a 1/2″ to 3/4″ female adapter in the middle and a 3/4″ to hose male adapter).
Prime your pieces and cement them into place!!
Now with your 4 (3/4″) pipe pieces, drill random holes in the pipe. We kind of had our holes staggered so that the water would shoot out at different angles. We also made our holes different sizes.
Now piece your 4 (3/4″) pipes (with holes drilled in them!) together with the threaded side outlet elbows (1/2″ threading should be up). Holes that you drilled in the pipe should be angled slightly in (towards the center) to ensure maximum soak-ability!
After the cement is dry, all you have to do is screw in the four “T”-shaped legs to the top (securely) and plug in a hose to the adapter on the bottom.
Turn the hose on as high as you can for the strongest water-stream.
Let the soaking begin!











would love to have you link up to the sunday showcase - http://momto2poshlildivas.blogspot.com/2011/08/sunday-showcase-81411-link-up-share.html
It's a weekly child centered linky party I co-host every week. We are oepn for links from Sat night thru Thursday! Hope you stop by to share.
Bernadette
Our companys products are Sprinkler Pipes, PVC pipes, PVC riser pipes, PPR pipes, PEX Pipes, PPRC Pipes, PVC column pipes, PVC plumbing pipes, UPVC pipes, & Water Storage Tanks and All type of pipes fitting, Supplier, Wholesalers, exporters & manufacturers in India.
threaded tube